
CleverFilled Installation Instructions
CleverFilled Pet Hydration Station – Installation Instructions
Version 9-26 · Keep these instructions for future reference.
Congratulations on your purchase of the world's best pet hydration station. It has been thoughtfully designed, hand-assembled and fully tested in the USA for maximum performance and ease of installation. When installed per these instructions, your water bowl will provide many years of trouble-free operation.
⚠ Important Safety Information
- When replacing the inner and outer bowl, be sure the larger, outer bowl is empty. Inserting the smaller bowl can displace any water in the outer bowl, which can spill onto the floor and soak the failsafe expansion puck, raising the red indicator. This can happen if you fill the outer bowl, pour water from the small bowl into it, or open the blue valve while the Tank Front is up. (It's OK to install the small bowl already filled with water, since its 1-way valve holds the water in.)
- Mount level on a vertical surface. Install the bowl on a wall or cabinet side, using the provided Bubble Level (#13). The failsafe valve may not work properly if the device is not level.
- Connect to cold, potable (drinking) water only. Do not connect to a hot water line, as this presents a scalding danger.
- Do not install where the bowl or tubing could freeze. Frozen water can crack the tubing, fittings, or float valve and cause a leak when it thaws. This device is intended for indoor use only.
- Leak protection is limited to the device. The built-in failsafe valve shuts off the water supply if the float valve or a fitting inside the device fails. It does not protect against leaks in the tubing or at your water source connection. Check all connections after installation and again after 24 hours, and inspect exposed tubing regularly for chewing or damage.
- Never turn on the water unless the outer bowl is installed. The failsafe valve only works when the outer bowl is in place. Without it, water can flow onto the floor without shutting off.
- If the red indicator rises (near the logo on top of the device), the water supply is off. Your dog will not get fresh water until the problem is fixed. Find and correct the cause, then replace the failsafe expansion puck (two spares are included, #14) before turning the water back on.
- Always turn the blue valve OFF (¼ turn clockwise) before removing the Tank Front, bowls, or failsafe valve. Turn it back on only after the Tank Front is fully down.
- Do not adjust or modify the float valve. The water level is set at the factory to work with the failsafe valve. Changing it can cause the bowl to overflow, trip the failsafe valve, or stop refilling, and may void your warranty.
- Daily checks. This bowl does not replace regular supervision of your pet's water supply. Assure water is present and the red indicator isn't showing. The bowl will still require occasional cleaning, especially the small bowl. At the same time, please inspect the umbrella (1-way) valve at the bottom of the small bowl to assure it is properly in place and preventing water from flowing back into the larger bowl.
Additional warnings for each water source appear at the top of its section below.
Tools you'll need
- Phillips #2 screwdriver, or drill motor with extension and Phillips standard bit (PH2)
- Drill bits:
- 1/8" for securing to wood paneling or studs
- 1/4" for securing to sheetrock with wall fasteners
- 5/16" for routing ¼" pipe through finished cabinetry
- 3/8" for routing ¼" pipe through walls and floors

Before you begin: what's in the box
Your bowl comes with 25 ft (7.6 m) of ¼" food-grade tubing already connected to the back of the device. Do not remove the tubing from the device. Valves and fittings for several water connection methods are included, so choose the one that best fits your home, your comfort level with DIY projects, and the features you want. Instructions and warnings for each method are in the Water Source sections below.
What's in the box

Each part below is numbered to match the photo. The instructions refer to parts by these names and numbers, for example "Tubing Cutter (#8)."
- Supply Adapter with ¼" Shutoff: Fits a standard 3/8" compression angle stop, for Method 4 (Cold Water Supply Valve). Other sizes and styles of supply valves exist, so check yours first.
- ¼" Union Tee Fitting: For Method 3 (RO System) and Method 5 (Refrigerator Water Line).
- Pressure-Reducing Valve (PRV): For Method 4 (Cold Water Supply Valve) and Method 5 (Refrigerator Water Line).
- Tank Sediment Filter: Goes on the tubing end inside the toilet tank, for Method 2 (Toilet Tank).
- Priming Syringe: Creates a vacuum that pulls water into the tubing to start the siphon, for Method 2.
- Tank Lid Pads (4): Self-adhesive foam pads. If your toilet tank has no notch for the tubing, they lift the lid slightly to leave room for it. For Method 2.
- Tank Tag: Attach to the tubing inside the toilet tank as a reminder: NO CLEANING PRODUCTS. For Method 2.
- Tubing Cutter / Release Tool: Cuts tubing cleanly, and its forked end releases push-to-connect fittings. ⚠ The blade is very sharp: keep fingers clear, especially when using the forked end, and keep the blade locked closed when not cutting.
- Adhesive Tubing Clips: Hold exposed tubing tight against walls and cabinets.
- Nail-Up Tubing Clips: Hold exposed tubing tight against baseboards and wood trim.
- 90° Tubing Bends: Clip to the outside of the tubing to make neat inside and outside corners.
- Sheetrock Anchors & Screws (3 each): For attaching the wall mount bracket.
- Bubble Level: In the accessory box.
- Spare Failsafe Expansion Pucks (2): Replace the puck if the red indicator rises (see the Safety section).
- Spare Logo Stickers: Trapezoid-shaped. Use one to measure tubing insertion depth (step 7). If you choose top entry, you can also use one to replace the logo you remove from the top of the device (step 5). Keep them on their backing until you need them.
Installation Steps
1. Choose a location
Kitchens, bathrooms, laundry rooms, utility rooms, and entryways work best. Rooms with water-resistant flooring are ideal: our bowls reduce splashing, but dogs still drip water from their jowls as they walk away. The side of a lower cabinet is often a great spot in a kitchen or bathroom, and the small bowls fit narrow spaces like hallways or beside a toilet.
Bowls can also be installed on covered porches and in garages, but should not be exposed to the elements or where they can fill with debris.
2. Plan the tubing route
Before mounting, plan a path from the bowl location to your water source. The flexible tubing can be run much like ethernet cable: through interior walls, under cabinets or behind toe-kicks, or through a basement or crawlspace.
If you're using the countertop reservoir, the tubing must run downhill all the way to the bowl (see Method 1: Countertop Reservoir). We encourage you to read ahead to understand the parameters of your preferred water source!
3. Remove the bowl and reservoir
Close the blue valve handle on top of the device (¼ turn clockwise), then slide the Tank Front straight up until it rests on the detent. Lift the water bowl out from the back. Then lift the front of the larger reservoir and unhook its back edge from the wall mount by letting the back drop. Both must be removed to install the mounting screws. (This is also how you'll remove them for cleaning.)
4. Mount the device
Choose the height. Use the chart below to find the center screw height for your dog, measured from the finished floor where your dog stands. The top of the bowl sits about ½" below the center screw, and the template has a printed line showing the finished height of the top of the bowl.
| Dog size | Example breeds | Center screw height |
|---|---|---|
| Toy | Chihuahua, Pomeranian, Yorkie | 6.5" (minimum) |
| Small | Shih Tzu, Maltese, Miniature Poodle | 6.5–8" |
| Small–medium | Beagle, Cocker Spaniel, French Bulldog | 8–10" |
| Medium | Border Collie, Australian Shepherd, Pit Bull | 10–12" |
| Medium–large | Labrador, Golden Retriever, Boxer | 12–14" |
| Large | German Shepherd, Doberman, Standard Poodle | 14–16" |
| Giant | Great Dane, Mastiff, Newfoundland | 16–18" |
- Measure your dog. Dogs of the same breed can vary a lot. For the best fit, measure from the floor to your dog's elbow while standing, and set the center screw at about that height.
- Short-legged breeds like Corgis, Dachshunds, and Basset Hounds should use the measurement method, or mount at the minimum height.
- Multiple dogs? Mount for the shortest dog. Taller dogs can easily lower their heads to drink.
- Minimum height: Don't mount the center screw lower than 6.5". The outer bowl needs room below the device to drop down when you remove it.
- Using the toilet tank method? Keep the center screw at 17" or lower. Lower mounting fills faster.
- Growing puppy? You can move the bowl up 2" at a time as your dog grows. The device covers the old holes, so no patching is needed. Leave a few extra inches of tubing slack near the bowl so it can reach the new position.
Mark the holes. The mounting template is the cardboard divider in the shipping box. Tape it to the wall at your chosen height, and insert the Bubble Level (#13) into the small cutout on the template.
Adjust until the bubble is centered, and mark the three screw holes. If possible, locate the center hole on a wall stud; the device will still be well secured if all three Sheetrock Anchors (#12) are used. The device must be level for the failsafe valve to work properly.
Drill the mounting holes:
- Drywall: 1/4" bit, then screw in the provided Sheetrock Anchors.
- Wood paneling or a wall stud: 1/8" bit.
Attach the wall mount bracket with the three (3) provided screws (#12). The center screw may require a screwdriver bit extension. Place the Bubble Level on the bracket to confirm it's still level before moving on.
5. Choose top or bottom entry and seat the tubing
The tubing comes connected to a swiveling fitting inside the device, so it can exit from either the top or the bottom. Both options keep the tubing flush against the wall and away from your dog's teeth. Tubing that comes straight through the wall or floor can enter at the back of the device. If you're using the countertop reservoir, choose top entry (see Method 1).
- Bottom entry: Swivel the fitting down. Press the tubing into the channel on the bottom of the device. It takes firm pressure to work the tubing past the small teeth that hold it in place, so work it in along the full length of the channel.
- Top entry: Swivel the fitting up. Peel off the logo sticker covering the notch on top of the device, then route the tubing through the notch. If you like, apply one of the Spare Logo Stickers (#15) somewhere else on the device.
Reinstall the reservoir and bowl, and slide the Tank Front back down. Leave the blue valve closed until your water source is connected.
6. Run the tubing to your water source
Work from the bowl toward your water source.
Use a 3/8" bit for tubing holes. When routing into a basement or crawlspace, check below before drilling. A 24" or longer bit lets you drill at an angle through the drywall and the wall's bottom plate, so you don't have to drill through the floor.
Use the 90° Tubing Bends (#11) for neat turns, and secure the tubing with the Adhesive Tubing Clips (#9) and Nail-Up Tubing Clips (#10). Keep any exposed tubing tight against walls and surfaces. If your dog likes to chew, add protection such as snap track or wire molding, or apply a bitter anti-chew spray.
7. Cut and connect the tubing
At the water source, cut off the excess tubing, leaving a few inches of slack. Then follow the warning below and the section for your water source method.
- Cut the tubing straight using the Tubing Cutter. Do not use scissors or a knife, which can leave an angled or crushed end that won't seal. Keep your fingers clear of the blade.
- Straighten the end. The tubing has a natural curl. Straighten the last few inches with your fingers so it enters the fitting straight.
- Mark the insertion depth. Use a Spare Logo Sticker (#15) to measure the insertion depth, equal to the distance between the dog's and cat's back feet, and make a mark on the tubing. (This is 11/16" or 18 mm, a bit less than the diameter of a US dime.)
- Push past the resistance. You'll feel resistance about halfway in. The tubing is NOT fully inserted yet. Push firmly until the mark touches the fitting.
- Pull test. Tug the tubing firmly. It should not move.
- Check for leaks. Once the water is on, check every connection. Check again after 24 hours.
To remove tubing: Use the forked end of the Tubing Cutter / Release Tool (#8) to press the fitting's collar in toward the fitting, then pull the tubing out. Never pull tubing out without pressing the collar, as this can damage the tubing and the fitting. ⚠ Caution: the cutter blade is very sharp, and your hand is close to it when you use the forked end. Keep fingers clear of the blade.
Water Source Methods
Each method below assumes you have already mounted the bowl and run the tubing (Installation Steps 1–6). Each one ends with its own steps for starting the water, since fill times vary a lot by method. Tap a method to open it.
Method 1: Countertop Reservoir (sold separately)
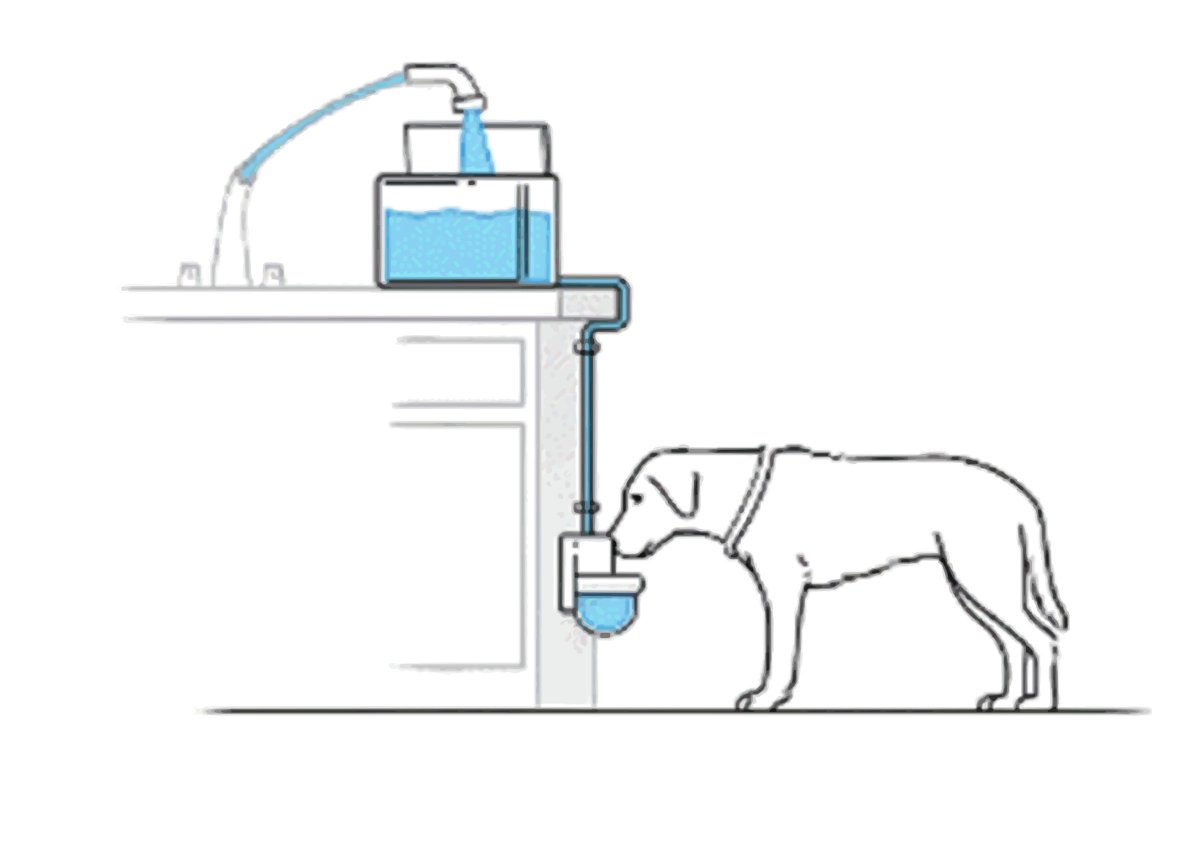
- Set up the countertop reservoir where you want it. It's easiest to fill with a flexible sink sprayer, but you can also use a pitcher.
- Run the tubing downhill all the way from the reservoir to the bowl. Avoid loops, sags, or any section where the tubing goes back up, because these can trap air that gravity alone may not push through (for example, if the countertop reservoir runs dry and is then refilled).
- Use the top entry into the bowl (see diagram). The bottom entry requires water to flow up through a vertical pipe, which makes trapped air harder to clear.
- The reservoir has a quick disconnect so you can separate it from the supply tubing for cleaning. Cut the tubing to length and install the male half of the quick disconnect on the tubing end. ⚠ Fully insert the tubing: follow every step of the push-to-connect warning in Installation Step 7.
- Connect the male half to the reservoir.
Start the water: Fill the reservoir. Confirm the outer bowl is installed and the Tank Front is fully down, then open the blue valve (¼ turn counterclockwise). Allow about 10–15 minutes for the bowl to fill completely. Check all connections for leaks, and check again after 24 hours.
Method 2: Toilet Tank
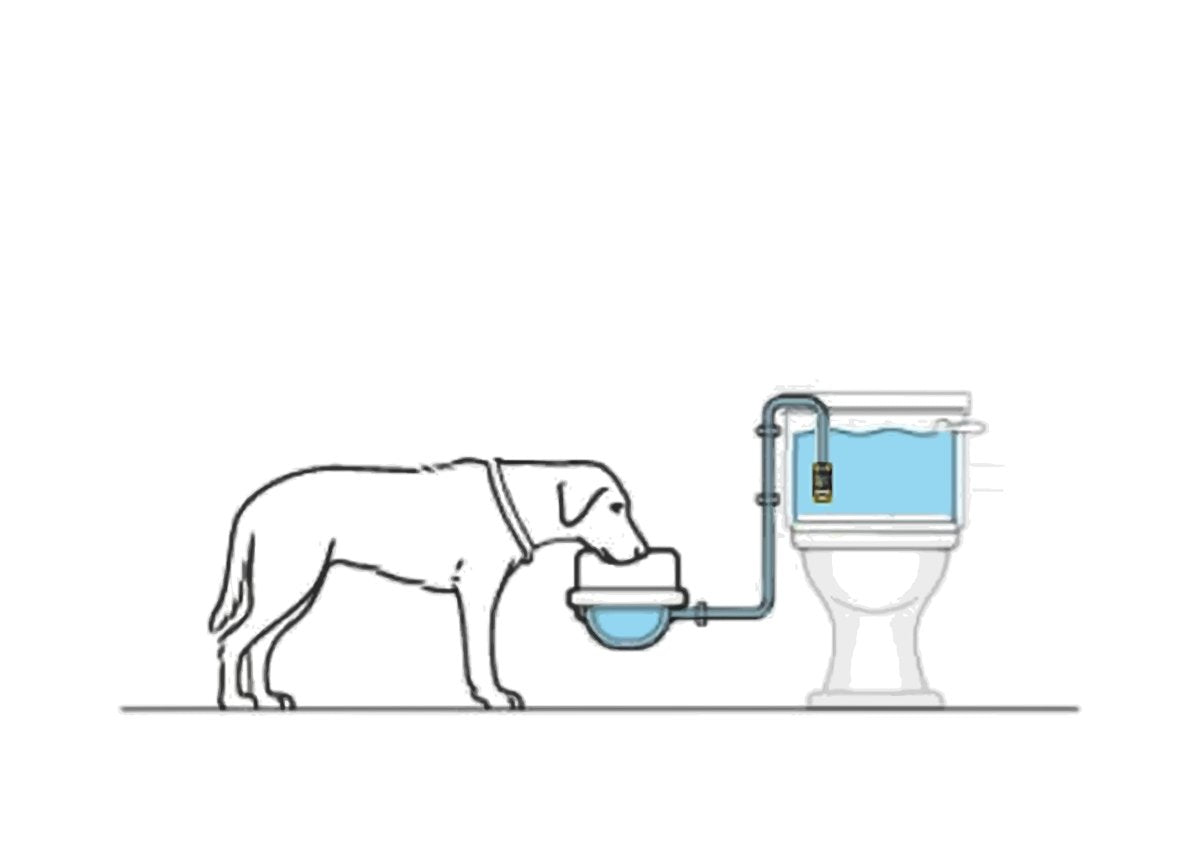
If your toilet's flush button is on top of the tank lid, check for a gap where the ¼" tubing can pass out the back. If there's no room for the tubing, choose another water source method.
- Mounting height: See the warning above. Use the height chart in step 4, and keep the center screw at 17" or lower for this method. The siphon fills faster when the bowl is mounted lower.
- Hook over the tank: Use two 90° Tubing Bends (#11) to form a hook over the top of the toilet tank. Choose a spot at the back of the tank that won't obstruct the parts inside. Some tanks have a notch below the lid; if yours doesn't, stick the four Tank Lid Pads (#6) on the top edge of the tank, one near each corner, to create a gap for the tubing.
- Tank Sediment Filter: Install another 90° Tubing Bend so the tubing rests on the bottom of the tank. Cut the tubing, leaving a tail for the filter. Push the Tank Sediment Filter (#4) onto the tubing end about 11/16" (18 mm).
- Placement: Keep the filter and tubing away from the flapper, chain, and flush valve. Place them in a back corner of the tank. Check that the toilet stops running after flushing.
- Tank Tag: Attach the Tank Tag (#7) to the tubing inside the tank so the text is visible.
Your toilet tank refills with fresh supply water after every flush, providing a steady source of water for your pet's bowl. Some municipal water and private wells leave natural sediment or other deposits on the bottom of the tank. The Tank Sediment Filter keeps larger particles from fouling the device's plumbing, but it's good practice to check for and remove any buildup inside the toilet tank. A few feet of flexible plastic hose from a hardware store can be used to siphon sediment from the tank into the toilet bowl.
Start the water (prime the siphon):
- Open the Tank Front until it rests on the detent that holds it open.
- Swing the siphon arm out to a comfortable position (look for the black end-cap). Use the forked end of the Tubing Cutter (#8) to remove the black cap. ⚠ Caution: the cutter blade is very sharp, and your hand is close to it when you use the forked end. Keep fingers clear of the blade.
- Start with the Priming Syringe (#5) plunger all the way in (0 ml). Place the syringe onto the end of the ¼" tubing; it fits snugly to seal. Pull back on the plunger to the 60 ml mark and hold it there for 10 seconds. This pulls water into approximately 15' of tubing. If you don't see water on the first try, remove the syringe, push the plunger all the way in, and repeat. You've created the siphon when you have water in the syringe.
- ⚠ Fully push the black cap back onto the siphon orifice (short tubing): follow every step of the push-to-connect warning in Installation Step 7. Swing the siphon arm back into the device.
- Install both bowls, slide the Tank Front down, and turn the blue valve back on, which also locks the Tank Front down.
Allow about 15–20 minutes for the bowl to fill completely, depending on tubing length and mounting height.
Method 3: RO System
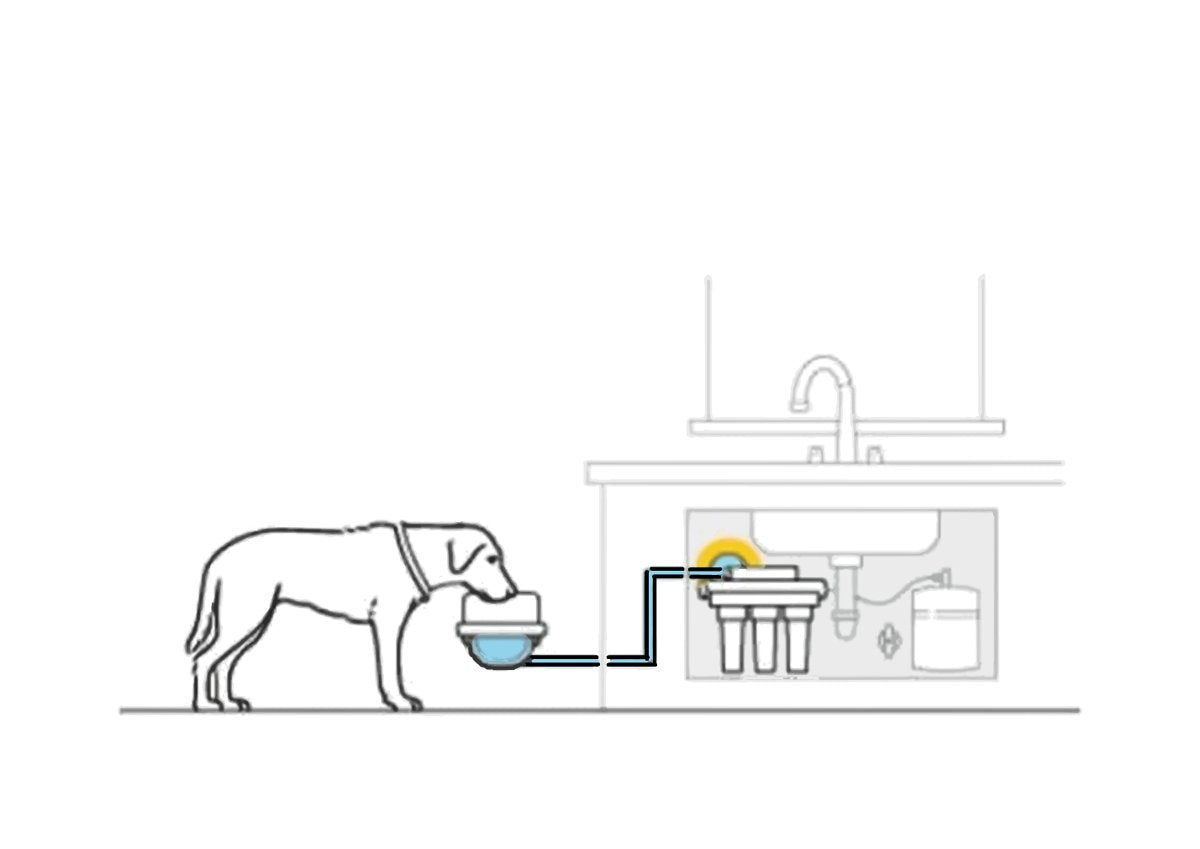
We recommend this connection method for tank-style residential RO systems with ¼" tubing. Other types of RO system (for example, systems with pumps and/or higher pressures) may require different fittings or may not otherwise be compatible.
Do not use the Pressure-Reducing Valve (PRV, #3) for this installation. The output side of a tank-style RO system is already low pressure.
- Depressurize the RO system: Close the feed water valve that supplies the RO system, close the valve on top of the storage tank, then open the RO faucet until water stops flowing.
- Install the tee: Locate the tubing that runs from the storage tank (or final filter) to the RO faucet. Cut it and install the ¼" Union Tee Fitting (#2), reconnecting both ends.
- Connect the bowl: Connect the tubing from your bowl to the open port of the tee. ⚠ Fully insert the tubing at all three tee connections: follow every step of the push-to-connect warning in step 7.
- Restore the RO system: Close the RO faucet, reopen the storage tank valve and the feed water valve, and check the tee connections for leaks.
Start the water: Confirm both bowls are installed and the Tank Front is fully down, then open the blue valve (¼ turn counterclockwise). With a full RO tank, the bowl should fill within a few minutes. If the tank was drained, it may take a few hours for the RO system to refill, and the bowl will fill slowly in the meantime. Check all connections again after 24 hours.
Method 4: Cold Water Supply Valve
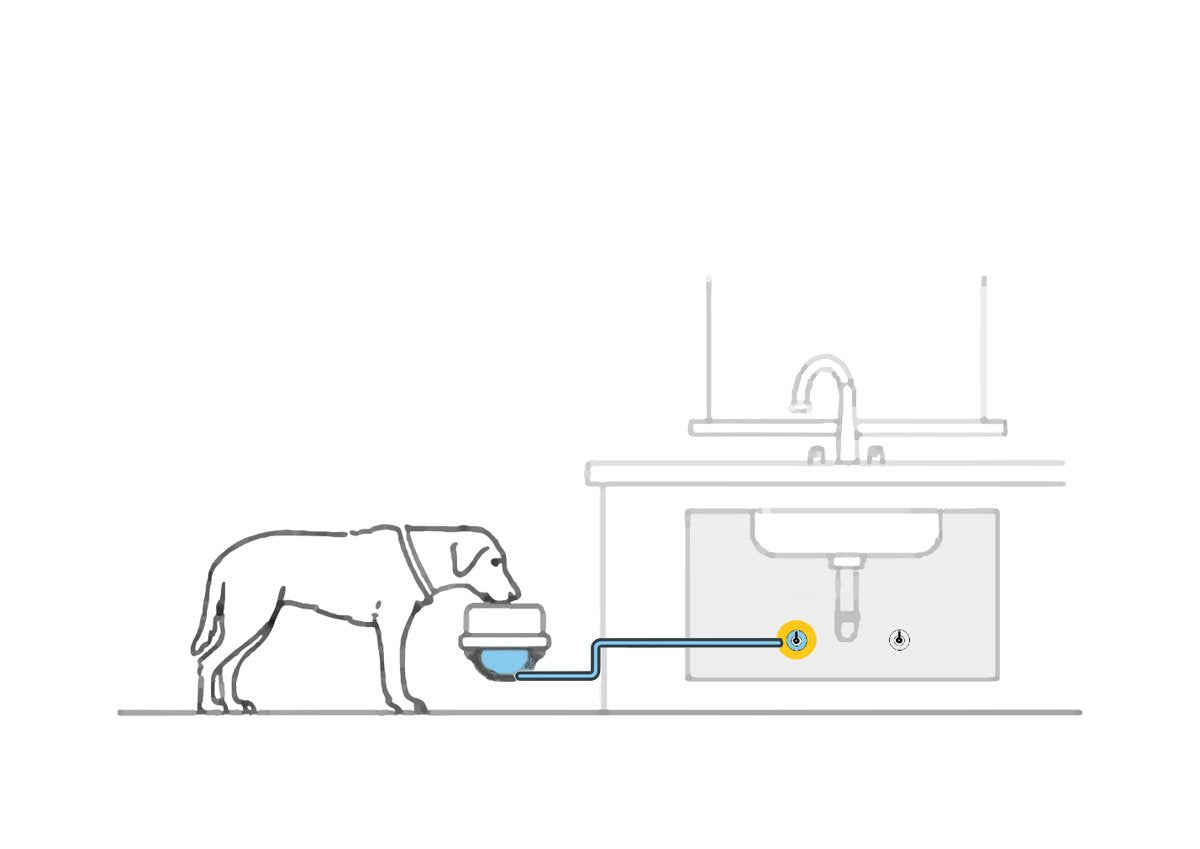
Check your valve first. The Supply Adapter (#1) fits a ⅜" compression angle stop, the standard shutoff valve under most toilets and faucets. Some older homes have ½" angle stops, and washing machine valves use a different thread. Confirm your valve before starting.
- Shut off the water: Turn the angle stop clockwise until it stops. Then flush the toilet (or open the faucet, at a sink) to relieve pressure. If the toilet tank refills or the faucet keeps running, the angle stop isn't fully closing. Don't continue; have the valve replaced or use another water source method. Place a towel and a small container underneath to catch the cup or so of water left in the supply line.
- Disconnect the supply line: Unscrew the flexible supply line from the angle stop.
- Install the Supply Adapter: Thread the adapter's female end onto the angle stop outlet, then thread the flexible supply line onto the adapter's male end. Hand-tighten each, then snug with a wrench about ¼ turn while holding the angle stop steady with a second wrench so it doesn't twist. Make sure the adapter's ¼" ball valve is closed.
- Install the PRV: Cut a 2" piece of tubing. Connect it from the ¼" ball valve to the PRV inlet, matching the flow-direction arrow on the PRV so water flows toward the bowl. Then connect the tubing from your bowl to the PRV outlet. ⚠ Fully insert the tubing at every connection: follow every step of the push-to-connect warning in step 7.
- Check the adapter: With the ¼" ball valve still closed, open the angle stop and check the adapter and supply line connections for leaks.
- Open the ¼" valve: Once those connections are dry, open the ¼" ball valve and check the PRV connections for leaks.
Start the water: Confirm the outer bowl is installed and the Tank Front is fully down, then open the blue valve. The bowl should fill within a minute or two. Check all connections again after 24 hours.
Method 5: Refrigerator Water Line
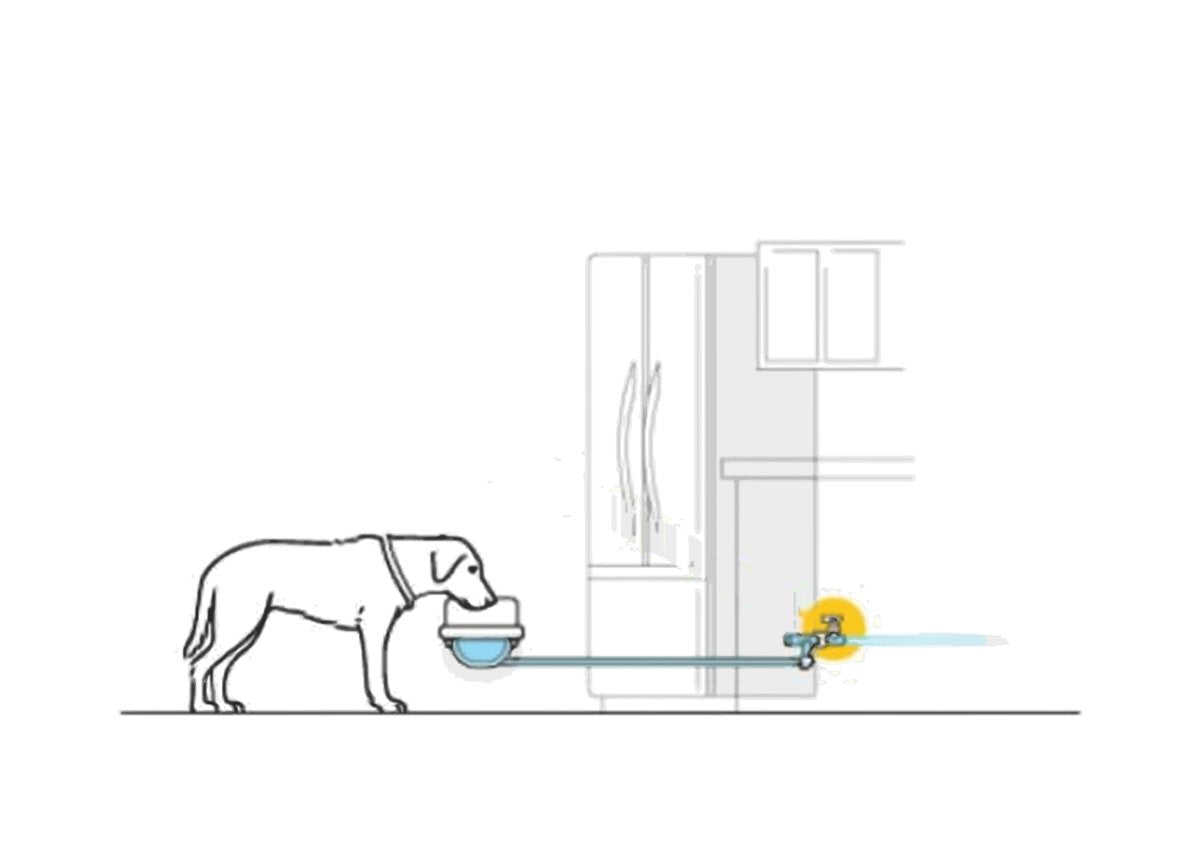
Check your line first. This method works with ¼" OD plastic or soft copper refrigerator lines. Braided stainless steel lines are not supported. If your refrigerator line is supplied by an RO system, follow Method 3 instead.
Where to connect: Most refrigerator lines start under the kitchen sink and run under the cabinets to the refrigerator, so you can usually connect under the sink without moving the refrigerator. You can also connect behind the refrigerator if that's easier for your tubing route.
- Shut off the water: Turn off the valve that supplies the refrigerator line (often at the sink's cold water angle stop, or a small valve on the line itself). If your refrigerator has a water dispenser, run it until the water stops to relieve pressure. Place a towel underneath to catch drips.
- Install the tee: Choose a straight, easy-to-reach section of the refrigerator line. Cut it and install the ¼" Union Tee Fitting (#2), reconnecting both ends of the refrigerator line. Plastic tubing can be cut with the Tubing Cutter (#8), keeping fingers clear of its very sharp blade; copper tubing needs a small copper tubing cutter, and the cut end should be smooth with no burrs.
- Install the PRV on the bowl branch: Cut a 2" piece of tubing. Connect it from the open port of the tee to the PRV inlet, matching the flow-direction arrow on the PRV so water flows toward the bowl. Then connect the tubing from your bowl to the PRV outlet. Your refrigerator still receives full water pressure. ⚠ Fully insert the tubing at every connection: follow every step of the push-to-connect warning in step 7.
- Turn the water back on: Open the supply valve and check the tee and PRV connections for leaks. Run the refrigerator's water dispenser for a minute to clear any air from the line; it may sputter briefly.
Start the water: Confirm the outer bowl is installed and the Tank Front is fully down, then open the blue valve. The bowl should fill within a minute or two. Check all connections again after 24 hours.
The CleverFilled Bowl
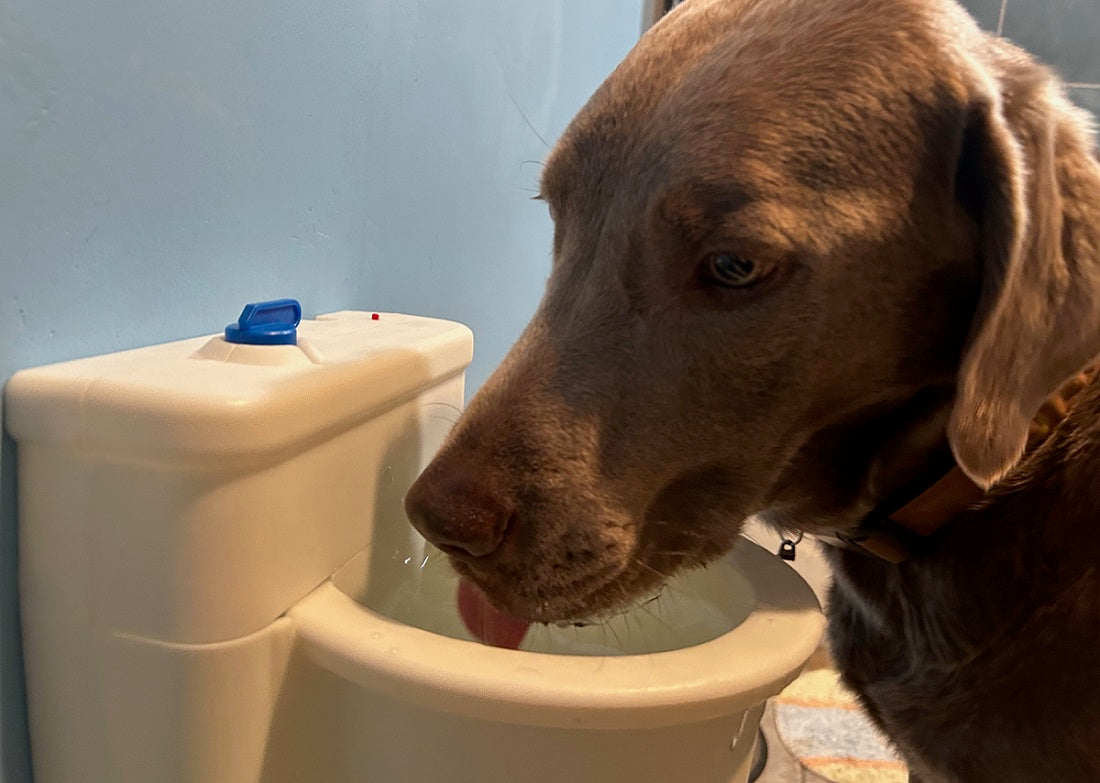
Clever engineering has solved your biggest compaints with providing water for your dog!
- Never let your indoor bowl go dry again! Our bowl safely refills endlessly as the pet drinks, with no plumbing or elctricity required!
- A self-filling bowl can be small and light. This makes it easy to clean and wastes less water.
- The small bowl contains the splash that can occur with long tongues and floppy flews.
- A wall-mounted bowl can be installed to your pup's perfect height. And wall-mounted means your family and guests will never trip on the water bowl again!
- When your pet drinks, fresh water flows! Your dog prefers this!